360 degree

Moving from 2D planar photos to 360 degree images is like jumping through the pane of glass of an image and immersing yourself in hat frame. Take your time, look around and view the wonders captured in that moment.

Today I want to teach you how to create a interactive 360 degree image viewer using plain old JavaScript with the help of A-Frame / ThreeJS and as usual you can go ahead and play with the results by following the link on the bottom.

A-Frame … say what ?

In the last episode we took some ShaderToy WebGL based shader and ported it to threejs and generated a nice animated background with this method.

A-Frame is using a XML based syntax to expose the underlying library of … you guessed it … threejs. That of course means that all features of threejs are at your convenience when using A-Frame.

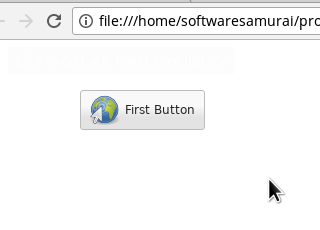
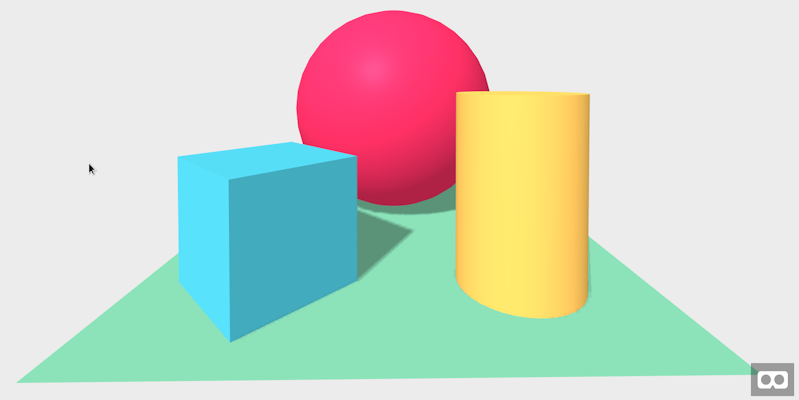
This combo does not only pack 360 degree of freedom but it also allows you to place elements in 3D space, which makes for a nice combo. Below is a simple “hello World” page using A-Frame.

<!DOCTYPE html>
<html>
  <head>
    <title>Hello, WebVR! - A-Frame</title>
    <meta name="description" content="Hello, WebVR! - A-Frame">
    <script src="https://aframe.io/releases/0.7.0/aframe.min.js"></script>
  </head>
  <body>
    <a-scene>
      <a-box position="-1 0.5 -3" rotation="0 45 0" color="#4CC3D9" shadow></a-box>
      <a-sphere position="0 1.25 -5" radius="1.25" color="#EF2D5E" shadow></a-sphere>
      <a-cylinder position="1 0.75 -3" radius="0.5" height="1.5" color="#FFC65D" shadow></a-cylinder>
      <a-plane position="0 0 -4" rotation="-90 0 0" width="4" height="4" color="#7BC8A4" shadow></a-plane>
      <a-sky color="#ECECEC"></a-sky>
    </a-scene>
  </body>
</html>
Hello AFrame
Hello AFrame

Also this library comes jam-packed with additional plugins and a vibrant community. Here is a link which lists some of the available tools and plugins. And then here is a weekly blog which lists all the cool things going on around A-Frame.

To say it in their own words: “A-Frame is a web framework for building virtual reality (VR) experiences. Originally from Mozilla, A-Frame was developed to be an easy but powerful way to develop VR content. As an independent open source project, A-Frame has grown to be one of the largest and most welcoming VR communities.

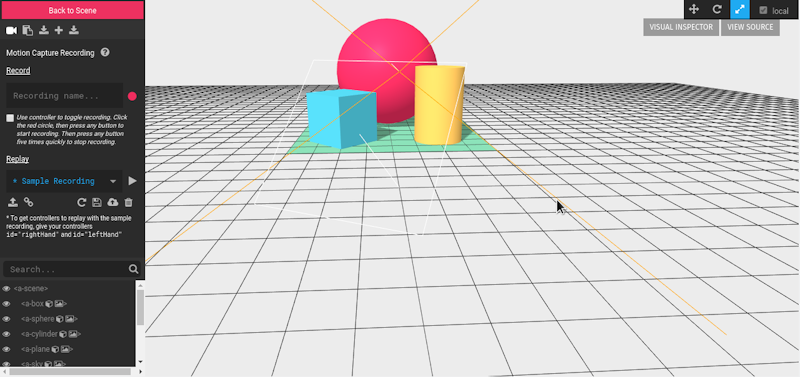
Another nice feature is the visual inspector which is available in every A-Frame scene. Simply hit “ctrl” + “alt” + “i”

Hello AFrame debug
Hello AFrame debug

360 degree Viewer:

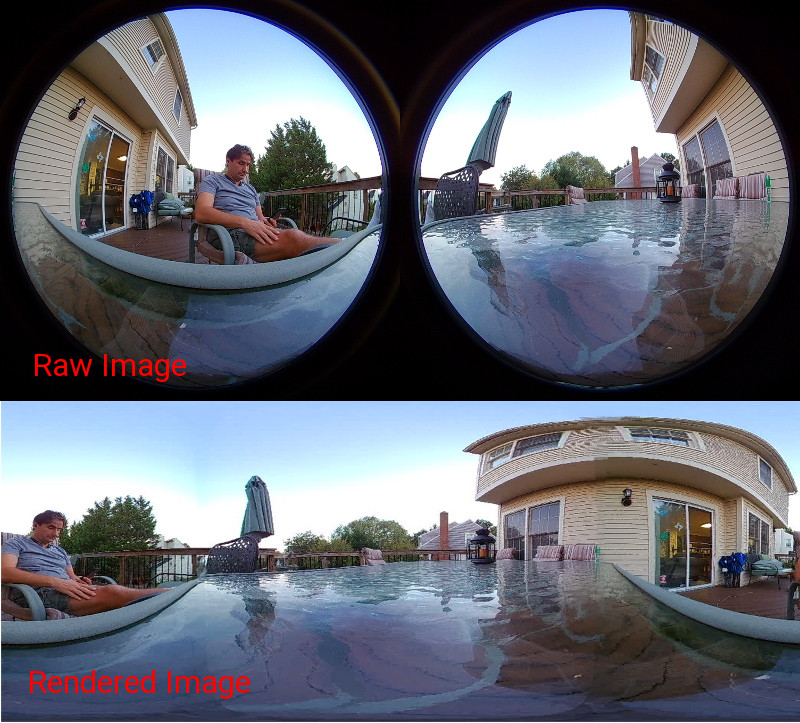
One of the things I have been playing around with lately is the Gear 360 camera from Samsung. As you can see from the image below, it has two large fish eye lenses which together capture a monoscopic 360 degree image or video.

The camera records with the two lense on a single rectangular region, in order to convert the images / videos from this raw input into a usable equirectangular view you have a couple of options at hand.

=> 360 degree

The easiest would be to own a Samsung phone and then simply have the Android app export the image / video already rendered. The second option Samsung offers is an external application for Windows or Mac OSX to convert the input to its proper format.

And then finally there are third party options available ( like 360 Tube ) or you can get smart and create your own. For brevity I went with option number one which also means that I have not a lot to say about this process in this post.

The takeaway here is that you need to have the images for the 360 Viewer already in equirectangular form available. In case you do not own a 360 camera you can easily find a ton of images online by searching for “360 equirectangular image” or similar.

Also I added a few sample images to this tutorial.

Lets go :

Our goal here is to create a basic html page which can display 360 degree images. So the first thing we have to create is the basic HTML document like so :

<!DOCTYPE html>
<html>
  <head>
    <meta charset="utf-8">
    <title>360&deg; Slideshow</title>
    <meta name="description" content="360&deg; Slideshow">
  </head>
  <body>
  </body>
</html>

Nothing to it. Next we can build the A-Frame based web page so we need to add two lines to the head section :

    <script src="https://rawgit.com/aframevr/aframe/ba2a287/dist/aframe-v0.7.1.min.js"></script>
    <script src="drag-look-controls.min.js"></script>

Including first the A-Frame library ( which includes threejs ) and in the second line I use a component to better navigate using the cursor. At this point we can go ahead and fill in the contents of the HTML body.

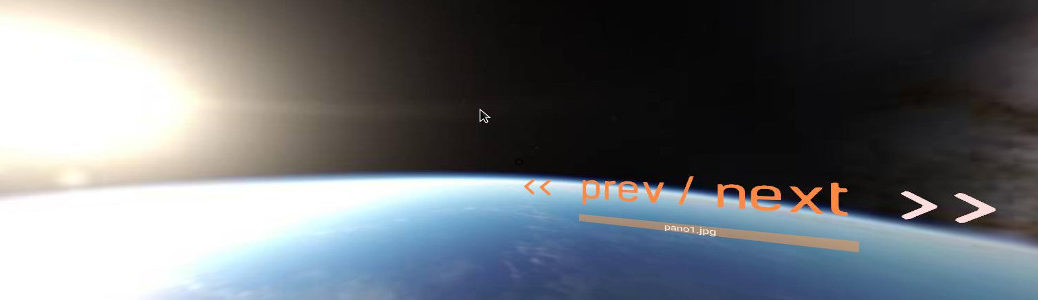
Working in 360 degree of freedom allows us to place elements inside the view and interact with them. I placed the controls to switch between images to the users right side so they don’t obstruct the main focal point in the 360 degree scene.

Below is the complete content and I will go through it line-by-line.

    <a-scene cursor="rayOrigin: mouse">
      <a-assets>
        <audio id="click-sound" src="click.ogg"></audio>
        <img id="pano1"  src="pano1.jpg">
        <img id="pano2"  src="pano2.jpg">
        <img id="pano3"  src="pano3.jpg">
        <img id="pano4"  src="pano4.jpg">
        <img id="pano5"  src="pano5.jpg">
        <img id="pano6"  src="pano6.jpg">
        <img id="pano7"  src="pano7.jpg">
        <img id="pano8"  src="pano8.jpg">
        <img id="pano9"  src="pano9.jpg">
        <img id="pano10" src="pano10.jpg">
      </a-assets>
      <a-sky id="pano" src="pano3.jpg" rotation="0 0 0"></a-sky>
      <a-camera drag-look-controls>

        <a-cursor id="cursor">
          <a-animation begin="click" easing="ease-in" attribute="scale"
                   fill="backwards" from="0.1 0.1 0.1" to="1 1 1" dur="500"></a-animation>
          <a-animation begin="cursor-fusing" easing="ease-in" attribute="scale"
                   from="1 1 1" to="0.1 0.1 0.1" dur="1500"></a-animation>
        </a-cursor>
      </a-camera>
      <a-text id="prev-txt" value=" << " color="#F84" width="4" position="-0.6  1.5 -1.0" font="kelsonsans">
        <a-animation attribute="rotation" begin="click" dur="500" fill="backwards" to="30 30 360"></a-animation>
      </a-text>
      <a-text value="prev / next" color="#F84" width="3" position="-0.35 1.5 -1.0" font="kelsonsans"></a-text>
      <a-entity id="file-name" geometry="primitive: plane; width: 0.7; height: auto" material="opacity: 0.5; color: #f84"  position="-0.0 1.35 -1.0" text="value: pano3.jpg; align: center"></a-entity>
      <a-text id="next-txt" value=" >> " color="#F84" width="4" position=" 0.4  1.5 -1.0" font="kelsonsans">
        <a-animation attribute="rotation" begin="click" dur="500" fill="backwards" to="30 30 360"></a-animation>
      </a-text>
      <a-box prev-click="" sound="on: click; src: #click-sound" visible="false" color="#aa77dd" width="0.28" height="0.18" depth="0.01" opacity="0.5" position="-0.5 1.48 -1.0"></a-box>
      <a-box next-click="" sound="on: click; src: #click-sound" visible="false" color="#aa77dd" width="0.28" height="0.18" depth="0.01" opacity="0.5" position="0.48 1.48 -1.0"></a-box>
    </a-scene>

Line 1 : defines the scene. Everything happens within a scene. So think of it as the starting point for your adventure into VR. in order to use the mouse to select an object you have to specify the rayOrigin attribute here.
Lines 2 – 14 : we define the assets ( images video, models, audio etc ) in these lines. The scene will not start before all assets are buffered in the browser. You can also dynamically load contents in which case you may not want to define them in the assets section.
Line 15 : defines the sky-box, which is basically a sphere on which the equirectangular image is plastered.
Lines 16 – 24 : Here we define the camera and the cursor. The drag-look-control enables the mouse to drag the frame which make navigation easier and more natural. I also added animations to the cursor to make things a bit ‘nicer’.
Lines 25 – 32 : Here we create three strings which we display in 3D space. “<<", "prev / next", and ">>”. Again some animation when the prev or next events are triggered.
Lines 33 – 35 : These two lines define an invisible box around the “<<", and ">>” text to allow us to select something with our mouse. YOu cannot directly point and select a text. Once selected, the events are then routed forward to the actual text elements to trigger the animation.

That was it, that was all we had to do to get the scene setup and ready. Except …

Finally some JavaScript

You can use the above and you can already immerse yourself in a 360 degree world, except you will not be able to switch between images as we have not yet implemented the JavaScript handler for the mouse action. So lets do that then …

  var gPanoStart = 1;
  var gPanoEnd   = 10;
  AFRAME.registerComponent('prev-click', {
    init: function () {
      this.el.addEventListener ( 'click', function (evt) {
        var txt = document.getElementById ( "prev-txt" );
        txt.click ( );
        var el = document.getElementById ( "pano" );
        if ( ! el.cnt || el.cnt <= gPanoStart )
          el.cnt = gPanoEnd+1;
        el.cnt--;
        var src, srcName = "pano"+el.cnt;
        src = document.getElementById ( srcName );

        var fileName = src.src.replace(/^.*[\\\/]/, '')
        el.setAttribute ( "src", "#"+srcName );
        txt = document.getElementById ( "file-name" );
        txt.setAttribute ( "text", "value", fileName );
      } );
      this.el.addEventListener ( 'mouseenter', function (evt) {
        var txt = document.getElementById ( "prev-txt" );
        txt.setAttribute ( "color", "#FFDDDD" );
      } );
      this.el.addEventListener ( 'mouseleave', function (evt) {
        var txt = document.getElementById ( "prev-txt" );
        txt.setAttribute ( "color", "#FF8844" );
      } );
    }
  } );
  AFRAME.registerComponent('next-click', {
    init: function () {
      this.el.addEventListener ( 'click', function (evt) {
        var txt = document.getElementById ( "next-txt" );
        txt.click ( );
        var el = document.getElementById ( "pano" );
        if ( ! el.cnt || el.cnt >= gPanoEnd )
          el.cnt = gPanoStart-1;
        el.cnt++;
        var src, srcName = "pano"+el.cnt;
        src = document.getElementById ( srcName );

        var fileName = src.src.replace(/^.*[\\\/]/, '')
        el.setAttribute ( "src", "#"+srcName );
        txt = document.getElementById ( "file-name" );
        txt.setAttribute ( "text", "value", fileName );
      } );
      this.el.addEventListener ( 'mouseenter', function (evt) {
        var txt = document.getElementById ( "next-txt" );
        txt.setAttribute ( "color", "#FFDDDD" );
      } );
      this.el.addEventListener ( 'mouseleave', function (evt) {
        var txt = document.getElementById ( "next-txt" );
        txt.setAttribute ( "color", "#FF8844" );
      } );
    }
  } );

Both of these functions are almost identical, the first handles the prev-action, the second handles the next-action. I could have optimized it to decrease the code footprint but this would make it harder to read it. So lets only look at the first function.
Lines 1 – 2 : Here we define the global variables containig the starting and ending number of the images to load.
Line 3 : registerComponent is A-Frames way to do stuff. prev-click is the invisible rectangle which we are using to capture the mouse ‘ray’ to cause a certain action like click, mouseenter, or mouseout.
Line 4 : init. ‘nough said. just go with me here.
Lines 6 – 7 : Here we get the dom element of the actual visible text element and trigger a click event. This in turn will trigger the animation which we have defined for this element.
Line 9 : we retrieve the dom element of the sky-box.
Lines 9 – 13 : Here we make sure the counter is in between Start and End, and we create the id of the source file as defined in the <a-assets> – tag.
Line 15 : Here we get the ‘src’ attribute of the dom element and extract the actual file name to display.
Line 16 : is what makes the image switch, where we set the src of the sky-box.
Lines 17 – 18 : These two lines change the display of the filename inside the A-Frame. This way you know what you are looking at.
Lines 20 – 27 : These two functions will simply change the text color of the prev and next text to imply a hot-spot to the user.

Aside from line 3 and 4 this should look all too familiar to anyone who tinkered in plain old javaScript ( and who has not done so ? ).

You can get this code, adjust the images, and use it to add a 360 degree image viewer into your own web page. You can also use what you have learned here today and add additional control elements like slideshow, auto-rotate, hot-spots etc to it.

360° image Viewer:

I also created a video to set this up which you can find here …

Please follow this link here … to play with the code.

Spice it up with WebGL

The internet has evolved a lot since it’s inception with the initial intend to serve as a means to link hypertext documents together. The browser is now as capable as anything and when chrome WebGL support was introduced in 2011 we opened the portal to another dimension for the web.

Microsoft introduced the concept of DHTML (Dynamic HTML) with the release of Internet Explorer 4 in 1997. This first step away from static contents allowed you to dynamically size and move things around, E.g. like the space-shuttle and the satellite on my first homepage.

DHTML example
Example of DHTML

In 2008 the first working draft of HTML5 came out and with it the beginning of the end of Flash. Two new technologies in particular caused a lot of excitment in the web development community. SVG, and Canvas ( 2D-Context only ).

Finally in 2011 Google introduced WebGL as the 3D context of the canvas element on all platforms. By now ( 2017 ) all browsers support one of the WebGL standards ( v1.0 or v2.0 ) , after all 6 years is an eternity for the internet. You can count on hardware accelerated 3D graphics rendering on mobile devices as well as on the desktop browsers.
Please check here for your current browser.

Welcome to the world of 3D

WebGL is rendered in hardware and is thus quite fast and capable. Aside from writing your own games you can also use it like any other graphic asset on your web page and E.g. use it as your dynamic, über-cool 3D background.

The only thing you will have to keep in mind is the performance of your visitors computers / mobile devices.

Three.JS, ShaderToy and WebGL

In this episode I am going to develop a 3D animated background in POJS ( Plain Old JavaScript ), as well as in QooxDoo. The goal is to use one of the demos from ShaderToy, convert it to Three.JS and utilize it inside a canvas – tag with a 3D-Context.

Well if the last sentence was too much for you, don’t worry I will go through all details of this in the next few paragraphs.

But first lets have a look at the individual tools and technologies.

WebGL

As previously stated WebGL became part of the browser in 2011. In order to create a simple scene you have to write a bunch of JavaScript code

<!DOCTYPE html>
<html>
<head>
        <title>Basic WebGL</title>
</head>
<body>
<script type="text/javascript">
function shaderProgram(gl, vs, fs) {
        var prog = gl.createProgram();
        var addshader = function(type, source) {
                var s = gl.createShader((type == 'vertex') ?
                        gl.VERTEX_SHADER : gl.FRAGMENT_SHADER);
                gl.shaderSource(s, source);
                gl.compileShader(s);
                if (!gl.getShaderParameter(s, gl.COMPILE_STATUS)) {
                        throw "Could not compile "+type+
                                " shader:\n\n"+gl.getShaderInfoLog(s);
                }
                gl.attachShader(prog, s);
        };
        addshader('vertex', vs);
        addshader('fragment', fs);
        gl.linkProgram(prog);
        gl.getProgramParameter(prog, gl.LINK_STATUS);
        return prog;
}

function attributeSetFloats(gl, prog, attr_name, rsize, arr) {
        gl.bindBuffer(gl.ARRAY_BUFFER, gl.createBuffer());
        gl.bufferData(gl.ARRAY_BUFFER, new Float32Array(arr),
                gl.STATIC_DRAW);
        var attr = gl.getAttribLocation(prog, attr_name);
        gl.enableVertexAttribArray(attr);
        gl.vertexAttribPointer(attr, rsize, gl.FLOAT, false, 0, 0);
}

function draw() {
        var gl = document.getElementById("webgl").getContext("experimental-webgl");
        gl.clearColor(0.8, 0.6, 0.4, 1);
        gl.clear(gl.COLOR_BUFFER_BIT);

        var prog = shaderProgram(gl,
                "attribute vec3 pos;"+
                "void main() {"+
                "       gl_Position = vec4(pos, 2.0);"+
                "}",
                "void main() {"+
                "       gl_FragColor = vec4(0.4, 0.6, 0.8, 1.0);"+
                "}"
        );
        gl.useProgram(prog);
        attributeSetFloats(gl, prog, "pos", 3, [
                -1,  0, 0,
                 0,  1, 0,
                 0, -1, 0,
                 1,  0, 0
        ]);
        gl.drawArrays(gl.TRIANGLE_STRIP, 0, 4);
}

function init() {
        draw();
}
// Wait for 100msec ...
setTimeout ( init, 100 );

</script>
<canvas id="webgl" width="400" height="200"></canvas>
</body>
</html>

Render Output :

Three.JS

Three.js was first released by Ricardo Cabello ( Aka MrDOOB ) to GitHub in April 2010.

It is released under the MIT license and became the de-facto standard for web based 3D programming in no time.
The reason is that three.js adds an abstraction layer on top of WebGL which allows you to program it more as you would expect it to be.

Below is a Three.JS powered “Hello World” example.

<!doctype html>
<html>
<head>
        <title>Three.JS Hello World</title>
</head>
<body style="margin: 0; overflow: hidden; background-color: #000;" >
        <div id="webgl"></div>
        <script src="three.min.js"></script>
<script>

        var webglEl = document.getElementById('webgl');
        var width   = window.innerWidth;
        var height  = window.innerHeight;

        // Earth params
        var radius   = 0.5;
        var segments = 32;
        var rotation = 6;  

        var scene = new THREE.Scene();
        var camera = new THREE.PerspectiveCamera(45, width / height, 0.01, 1000);
        camera.position.z = 1.5;
        var renderer = new THREE.WebGLRenderer();
        renderer.setSize(width, height);
        scene.add(new THREE.AmbientLight(0x333333));
        var light = new THREE.DirectionalLight(0xffffff, 1);
        light.position.set(5,3,5);
        scene.add(light);

        var sphere = createSphere(radius, segments);
        sphere.rotation.y = rotation; 
        scene.add(sphere)

        var clouds = createClouds(radius, segments);
        clouds.rotation.y = rotation;
        scene.add(clouds)

        var stars = createStars(90, 64);
        scene.add(stars);
        webglEl.appendChild(renderer.domElement);
        render();

        function render() {
                sphere.rotation.y += 0.0005;
                clouds.rotation.y += 0.0005;
                requestAnimationFrame(render);
                renderer.render(scene, camera);
        }

        function createSphere(radius, segments) {
                return new THREE.Mesh(
                        new THREE.SphereGeometry(radius, segments, segments),
                        new THREE.MeshPhongMaterial({
                                map:         THREE.ImageUtils.loadTexture('images/2_no_clouds_4k.jpg'),
                                bumpMap:     THREE.ImageUtils.loadTexture('images/elev_bump_4k.jpg'),
                                bumpScale:   0.005,
                                specularMap: THREE.ImageUtils.loadTexture('images/water_4k.png'),
                                specular:    new THREE.Color('grey')
                        })
                );
        }

        function createClouds(radius, segments) {
                return new THREE.Mesh(
                        new THREE.SphereGeometry(radius + 0.003, segments, segments),
                        new THREE.MeshPhongMaterial({
                                map:         THREE.ImageUtils.loadTexture('images/fair_clouds_4k.png'),
                                transparent: true
                        })
                );
        }

        function createStars(radius, segments) {
                return new THREE.Mesh(
                        new THREE.SphereGeometry(radius, segments, segments), 
                        new THREE.MeshBasicMaterial({
                                map:  THREE.ImageUtils.loadTexture('images/galaxy_starfield.png'), 
                                side: THREE.BackSide
                        })
                );
        }

</script>
</body>
</html>

Render Output :


As you can see, using Three.JS we can achieve much more with about the same number of lines. That is not to say that it is not possible to create amazing things in WebGL in just under 100 lines of code, however the best would be if you combine both approaches.

Please feel free to visit the main web page for Three.js and spend some time browsing the available samples. I am certain that you will discover some joy and wonders on this web page. In case you don’t know where to start. This is a perfect place to spend about 19 minutes of your existence, to remember the fallen.

Now let’s look at another favorite of mine. This time it is a web page to show off …

ShaderToy wonderland

If you visit the Shadertoy.com – web page, you will find a thousands of cool demos, including some small games, all written utilizing the graphics card hardware accelerate shader pipelines.

What I wanted to achieve in this episode of teaching JavaScript was to add this toy by Frankenburgh as a background to AstraNOS. Some minor adjustments, like no sound and no story telling ( yes if you watch the original long enough you will get the story ), just an ever spinning Galaxy …

ShaderToy and Three.JS combination

In order to marry those two we have to know the data required for ShaderToy to work and create the appropriate interface for them in the shader such that Three.JS can take on the rendering. See, Shadertoy creates all its magic on a 2D plane and displays the ‘texture’ then accordingly in the 3D context. Three.JS is all 3D through and through …

The following sample glues them into one big happy unity and dynamically loads the ( almost never changing ) vertex.shader, and then the fragment.shader code.

<!DOCTYPE html>
<html lang="en">
<head>
        <title>Galaxy</title>
</head>
<body style="background-color: #000000; margin: 0px; overflow: hidden; ">
        <div id="container"></div>
        <script src="three.min.js"></script>

<script>
function fetchFile ( path, callback, ctx )  {
    var httpRequest = new XMLHttpRequest();
    httpRequest.onreadystatechange = function() {
        if (httpRequest.readyState === 4) {
            if (httpRequest.status === 200) {
                if (callback) callback( httpRequest.responseText );
            }
        }
    };
    httpRequest.open('GET', path);
    httpRequest.send(); 
}

document.loadData = function ( files, clb, ctx, pre )  {
  var rsp  = [];
  var load = function ( list )  {
    if ( list.length === 0 ) {
      if ( clb )
        clb.call ( ctx, rsp );
      return;
    }
    var res = list.shift ( );
    var uri = pre ? pre : ""; uri += res;
    fetchFile ( uri, function ( data )  {
      rsp.push ( data );
      load ( list );
    }, this );
  };
  load ( files );
};

var container;
var camera, scene, renderer;
var uniforms;
var startTime;
var clock;

function init ( vert, frag )  {
  container = document.getElementById( 'container' );
  clock  = new THREE.Clock  ( );
  camera = new THREE.Camera ( );
  scene  = new THREE.Scene  ( );
  camera.position.z = 1;

  var geometry = new THREE.PlaneGeometry( 3, 3 );
  uniforms = {
    iGlobalTime: { type: "f", value: 1.0 },
    iResolution: { type: "v2", value: new THREE.Vector2() }
  };

  var fs = boilerPlate ( 1 ) + frag + boilerPlate ( 2 );
  var material = new THREE.ShaderMaterial( {
    uniforms: uniforms,
    vertexShader:   vert,
    fragmentShader: fs
  } );

  var mesh = new THREE.Mesh( geometry, material );
  scene.add( mesh );

  renderer = new THREE.WebGLRenderer();
  container.appendChild( renderer.domElement );

  onWindowResize();

  window.addEventListener( 'resize', onWindowResize, false );
}

function onWindowResize( event ) {
  uniforms.iResolution.value.x = window.innerWidth;
  uniforms.iResolution.value.y = window.innerHeight;
  renderer.setSize( window.innerWidth, window.innerHeight );
}

function animate ( )  {
  requestAnimationFrame ( animate );
  render ( );
}

function render() {
  uniforms.iGlobalTime.value += clock.getDelta ( );
  renderer.render ( scene, camera );
}

document.loadData ( [ "vertex.shader", "fragment.shader" ], function ( data )  {
  this.init ( data[0], data[1] );
  animate ( );
}, window, "/data/webgl/" );

   function boilerPlate ( part )  {
      var ret = "";
      if ( part === 1 )  {
        ret  = "//#extension GL_OES_standard_derivatives : enable\n";
        ret += "//#extension GL_EXT_shader_texture_lod : enable\n";
        ret += "#ifdef GL_ES\n";
        ret += "precision highp float;\n";
        ret += "#endif\n";
        ret += "uniform vec2      iResolution;\n";
        ret += "uniform float     iGlobalTime;\n";
        ret += "uniform float     iChannelTime[4];\n";
        ret += "uniform vec4      iMouse;\n";
        ret += "uniform vec4      iDate;\n";
        ret += "uniform float     iSampleRate;\n";
        ret += "uniform vec3      iChannelResolution[4];\n";
        ret += "uniform int       iFrame;\n";
        ret += "uniform float     iTimeDelta;\n";
        ret += "uniform float     iFrameRate;\n";
        ret += "struct Channel\n";
        ret += "{\n";
        ret += "    vec3  resolution;\n";
        ret += "    float time;\n";
        ret += "};\n";
        ret += "uniform Channel iChannel[4];\n";
        ret += "uniform sampler2D iChannel0;\n";
        ret += "uniform sampler2D iChannel1;\n";
        ret += "uniform sampler2D iChannel2;\n";
        ret += "uniform sampler2D iChannel3;\n";
        ret += "void mainImage( out vec4 c,  in vec2 f );\n";
      }
      else {
        ret  = "void main( void ){\n";
        ret += "  vec4 color = vec4(0.0,0.0,0.0,1.0);\n";
        ret += "  mainImage( color, gl_FragCoord.xy );\n";
        ret += "  color.w = 1.0;\n";
        ret += "  gl_FragColor = color;\n";
        ret += "}\n";
      }
      return ret;
    }

</script>

        </body>
</html>
varying vec2 vUv;
void main ( )  {
  vUv = uv;
  gl_Position = vec4( position, 1.0 );

}
// Galaxy shader
//
// Created by Frank Hugenroth  /frankenburgh/   07/2015
// Released at nordlicht/bremen 2015

// random/hash function              
float hash( float n )
{
  return fract(cos(n)*41415.92653);
}

// 2d noise function
float noise( in vec2 x )
{
  vec2 p  = floor(x);
  vec2 f  = smoothstep(0.0, 1.0, fract(x));
  float n = p.x + p.y*57.0;

  return mix(mix( hash(n+  0.0), hash(n+  1.0),f.x),
    mix( hash(n+ 57.0), hash(n+ 58.0),f.x),f.y);
}

float noise( in vec3 x )
{
  vec3 p  = floor(x);
  vec3 f  = smoothstep(0.0, 1.0, fract(x));
  float n = p.x + p.y*57.0 + 113.0*p.z;

  return mix(mix(mix( hash(n+  0.0), hash(n+  1.0),f.x),
    mix( hash(n+ 57.0), hash(n+ 58.0),f.x),f.y),
    mix(mix( hash(n+113.0), hash(n+114.0),f.x),
    mix( hash(n+170.0), hash(n+171.0),f.x),f.y),f.z);
}

mat3 m = mat3( 0.00,  1.60,  1.20, -1.60,  0.72, -0.96, -1.20, -0.96,  1.28 );

// Fractional Brownian motion
float fbmslow( vec3 p )
{
  float f = 0.5000*noise( p ); p = m*p*1.2;
  f += 0.2500*noise( p ); p = m*p*1.3;
  f += 0.1666*noise( p ); p = m*p*1.4;
  f += 0.0834*noise( p ); p = m*p*1.84;
  return f;
}

float fbm( vec3 p )
{
  float f = 0., a = 1., s=0.;
  f += a*noise( p ); p = m*p*1.149; s += a; a *= .75;
  f += a*noise( p ); p = m*p*1.41; s += a; a *= .75;
  f += a*noise( p ); p = m*p*1.51; s += a; a *= .65;
  f += a*noise( p ); p = m*p*1.21; s += a; a *= .35;
  f += a*noise( p ); p = m*p*1.41; s += a; a *= .75;
  f += a*noise( p ); 
  return f/s;
}

void mainImage( out vec4 fragColor, in vec2 fragCoord )
{
        float time = iGlobalTime * 0.1;

        vec2 xy = -1.0 + 2.0*fragCoord.xy / iResolution.xy;

        // fade in (1=10sec), out after 8=80sec;
        float fade = 1.0; //min(1., time*1.)*min(1.,max(0., 15.-time));
        // start glow after 5=50sec
        float fade2= 0.37; //max(0., time-10.)*0.37;
        float glow = max(-.25,1.+pow(fade2, 10.) - 0.001*pow(fade2, 25.));


        // get camera position and view direction
        vec3 campos = vec3(500.0, 850., 1800.0 ); //-.0-cos((time-1.4)/2.)*2000.); // moving
        vec3 camtar = vec3(0., 0., 0.);

        float roll = 0.34;
        vec3 cw = normalize(camtar-campos);
        vec3 cp = vec3(sin(roll), cos(roll),0.0);
        vec3 cu = normalize(cross(cw,cp));
        vec3 cv = normalize(cross(cu,cw));
        vec3 rd = normalize( xy.x*cu + xy.y*cv + 1.6*cw );

        vec3 light   = normalize( vec3(  0., 0.,  0. )-campos );
        float sundot = clamp(dot(light,rd),0.0,1.0);

        // render sky

    // galaxy center glow
    vec3 col = glow*1.2*min(vec3(1.0, 1.0, 1.0), vec3(2.0,1.0,0.5)*pow( sundot, 100.0 ));
    // moon haze
    col += 0.3*vec3(0.8,0.9,1.2)*pow( sundot, 8.0 );

        // stars
        vec3 stars = 85.5*vec3(pow(fbmslow(rd.xyz*312.0), 7.0))*vec3(pow(fbmslow(rd.zxy*440.3), 8.0));

        // moving background fog
    vec3 cpos = 1500.*rd + vec3(831.0-time*30., 321.0, 1000.0);
    col += vec3(0.4, 0.5, 1.0) * ((fbmslow( cpos*0.0035 ) - .5));

        cpos += vec3(831.0-time*33., 321.0, 999.);
    col += vec3(0.6, 0.3, 0.6) * 10.0*pow((fbmslow( cpos*0.0045 )), 10.0);

        cpos += vec3(3831.0-time*39., 221.0, 999.0);
    col += 0.03*vec3(0.6, 0.0, 0.0) * 10.0*pow((fbmslow( cpos*0.0145 )), 2.0);

        // stars
        cpos = 1500.*rd + vec3(831.0, 321.0, 999.);
        col += stars*fbm(cpos*0.0021);


        // Clouds
    vec2 shift = vec2( time*100.0, time*180.0 );
    vec4 sum = vec4(0,0,0,0); 
    float c = campos.y / rd.y; // cloud height
    vec3 cpos2 = campos - c*rd;
    float radius = length(cpos2.xz)/1000.0;

    if (radius<1.8)
    {
          for (int q=10; q>-10; q--) // layers
      {
                if (sum.w>0.999) continue;
        float c = (float(q)*8.-campos.y) / rd.y; // cloud height
        vec3 cpos = campos + c*rd;

                float see = dot(normalize(cpos), normalize(campos));
                vec3 lightUnvis = vec3(.0,.0,.0 );
                vec3 lightVis   = vec3(1.3,1.2,1.2 );
                vec3 shine = mix(lightVis, lightUnvis, smoothstep(0.0, 1.0, see));

                // border
            float radius = length(cpos.xz)/999.;
            if (radius>1.0)
              continue;

                float rot = 3.00*(radius)-time;
        cpos.xz = cpos.xz*mat2(cos(rot), -sin(rot), sin(rot), cos(rot));
 
                cpos += vec3(831.0+shift.x, 321.0+float(q)*mix(250.0, 50.0, radius)-shift.x*0.2, 1330.0+shift.y); // cloud position
                cpos *= mix(0.0025, 0.0028, radius); // zoom
        float alpha = smoothstep(0.50, 1.0, fbm( cpos )); // fractal cloud density
                alpha *= 1.3*pow(smoothstep(1.0, 0.0, radius), 0.3); // fade out disc at edges
                vec3 dustcolor = mix(vec3( 2.0, 1.3, 1.0 ), vec3( 0.1,0.2,0.3 ), pow(radius, .5));
        vec3 localcolor = mix(dustcolor, shine, alpha); // density color white->gray
                  
                float gstar = 2.*pow(noise( cpos*21.40 ), 22.0);
                float gstar2= 3.*pow(noise( cpos*26.55 ), 34.0);
                float gholes= 1.*pow(noise( cpos*11.55 ), 14.0);
                localcolor += vec3(1.0, 0.6, 0.3)*gstar;
                localcolor += vec3(1.0, 1.0, 0.7)*gstar2;
                localcolor -= gholes;
                  
        alpha = (1.0-sum.w)*alpha; // alpha/density saturation (the more a cloud layer\\\'s density, the more the higher layers will be hidden)
        sum += vec4(localcolor*alpha, alpha); // sum up weightened color
          }

          for (int q=0; q<20; q++) // 120 layers
      {
                if (sum.w>0.999) continue;
        float c = (float(q)*4.-campos.y) / rd.y; // cloud height
        vec3 cpos = campos + c*rd;

                float see = dot(normalize(cpos), normalize(campos));
                vec3 lightUnvis = vec3(.0,.0,.0 );
                vec3 lightVis   = vec3(1.3,1.2,1.2 );
                vec3 shine = mix(lightVis, lightUnvis, smoothstep(0.0, 1.0, see));

                // border
            float radius = length(cpos.xz)/200.0;
            if (radius>1.0)
              continue;

                float rot = 3.2*(radius)-time*1.1;
        cpos.xz = cpos.xz*mat2(cos(rot), -sin(rot), sin(rot), cos(rot));
 
                cpos += vec3(831.0+shift.x, 321.0+float(q)*mix(250.0, 50.0, radius)-shift.x*0.2, 1330.0+shift.y); // cloud position
        float alpha = 0.1+smoothstep(0.6, 1.0, fbm( cpos )); // fractal cloud density
                alpha *= 1.2*(pow(smoothstep(1.0, 0.0, radius), 0.72) - pow(smoothstep(1.0, 0.0, radius*1.875), 0.2)); // fade out disc at edges
        vec3 localcolor = vec3(0.0, 0.0, 0.0); // density color white->gray
  
        alpha = (1.0-sum.w)*alpha; // alpha/density saturation (the more a cloud layer\\\'s density, the more the higher layers will be hidden)
        sum += vec4(localcolor*alpha, alpha); // sum up weightened color
          }
    }
        float alpha = smoothstep(1.-radius*.5, 1.0, sum.w);
    sum.rgb /= sum.w+0.0001;
    sum.rgb -= 0.2*vec3(0.8, 0.75, 0.7) * pow(sundot,10.0)*alpha;
    sum.rgb += min(glow, 10.0)*0.2*vec3(1.2, 1.2, 1.2) * pow(sundot,5.0)*(1.0-alpha);

        col = mix( col, sum.rgb , sum.w);//*pow(sundot,10.0) );

    // haze
        col = fade*mix(col, vec3(0.3,0.5,.9), 29.0*(pow( sundot, 50.0 )-pow( sundot, 60.0 ))/(2.+9.*abs(rd.y)));

    // Vignetting
        vec2 xy2 = gl_FragCoord.xy / iResolution.xy;
        col *= vec3(.5, .5, .5) + 0.25*pow(100.0*xy2.x*xy2.y*(1.0-xy2.x)*(1.0-xy2.y), .5 );

        fragColor = vec4(col,1.0);
}

Render Output :

And now to AstraNOS

At this point we are almost at the point of adding it as a background to AstraNOS. I have to plugin the code into a QooxDoo base class called qx.core.Object and we are good to go.

Galaxy Background
Galaxy Background in AstraNOS

You can watch my video Here

And as usual you can go and play with the actual code Here …

Using a RESTFul API in JavaScript

I have just released the third video in the JavaScript Bushido series. This video will go into what is REST and how to leverage this interface in a Qooxdoo web application.

RESTful API Logo
RESTful API Logo

The normal HTTP based request / response paradigm shifted in 2005, when Ajax ( also known as XMLHttpRequest ) became popular through the utilization in google maps.

Before Ajax every call to the back-end server would usually refresh the whole web page unless you would do some iframe based trickery.

Additionally in 2011 both WebSockets, and WebRTC have been added to most browsers which allow an efficient way to  communicate between server and browser, as well as browser to browser.

Using either method, it is possible to load data or code dynamically into the web page.

What is REST:

REST stands for “Representational State Transfer

Roy Fielding defined REST in his PhD dissertation from 2000 titled
“Architectural Styles and the Design of Network-based Software Architectures” at UC Irvine.

Unlike SOAP-based Web services, there is no “official” standard for RESTful Web APIs. This is because REST is an architectural style, while SOAP is a protocol.

A RESTFula API usually provides a means to do CRUD operations on an object.

What is CRUD:

CRUD is an acronym and stands for Create, Read, Update, and Delete. It is a way to say
“I want to be able to create, read, update, or delete something somewhere” compressed into a single word.

Before there was REST there was JSON-RPC:
REST has become a de-facto standard in modern web based applications. It has replaced the XML based SOAP/WSDL
as well as JSON-RPC.

How does a REST interface look like ?

A typical RESTful API is accessed through a well defined endpoint on a web server.
For example if you go https://jsonplaceholder.typicode.com/photos/ you will receive a JSON response which is an array of 5000 objects.

[
  {
    "albumId": 1,
    "id": 1,
    "title": "accusamus beatae ad facilis cum similique qui sunt",
    "url": "http://placehold.it/600/92c952",
    "thumbnailUrl": "http://placehold.it/150/92c952"
  },
  {
    "albumId": 1,
    "id": 2,
    "title": "reprehenderit est deserunt velit ipsam",
    ...

If you are interested in more detail about one of the returned items you would additionally provide the id https://jsonplaceholder.typicode.com/photos/7 behind the RESTful endpoint.

{
  "albumId": 1,
  "id": 7,
  "title": "officia delectus consequatur vero aut veniam explicabo molestias",
  "url": "http://placehold.it/600/b0f7cc",
  "thumbnailUrl": "http://placehold.it/150/b0f7cc"
}

But how do I create things

The sample above only showed the retrieval of datafrom a web server. But as I said before REST lets you also execute create, update, and delete operations on the backend.

This is achieved by using different HTTP VERBS

  • POST: will create an object
  • PUT: will modify / update an object
  • GET: will retrieve an object ( mostly in JSON format )
  • DELETE: will delete an object
  • OPTIONS: will provide information about the API call ( not very often used )

The best way to experiment with REST is to install POSTMAN as a plugin for chrome.

Postman in action

You can watch my video Here

And as usual you can go and play with the actual code Here …

The most beautiful thing

I found the most beautiful thing while going down memory lane this morning I stumbled over this video from way back when.

Sometimes it is good to sit back and reflect on the wonders we have in our lives today which we no longer perceive as such. We are surrounded by wonderful things which we notice the same way we notice a ghost before our eyes. We are sleep-walking by them refusing to give our brain the chance truly understand.

From the omnipresent cellphone to the internet of things. The space projects which received a recent boost through Elon Musk to the vast data centers set up by Amazon and Google. These are all man made marvels. However I challenge you to think back to the last time you marveled at a butterfly or the beautiful lines in a tree from the ground to the sky.

Think back at the progress human kind has made in your lifetime and then think forward to the change our kids may see.

In the sixties it was all but certain that by the year 2000 we will be traveling to the moon on a regular basis. While this has not panned-out we have accelerated in other areas. We have overcome the cold war, rivers were cleaned up and nature was preserved. We are working towards high-tech, higher-tech, and cyber-tech. When the borg meet Wall-E, HALL 9000 will be forgotten.

The Borg find Wall-E

So wake up and look around. What are the wonders that you see ?

First QooxDoo Application

I have created the second video in the JavaScript Bushido series.

In this video I am taking a step back and going to the basics.

Installing Qooxdoo from github, and starting your first project.

To retrieve qooxdoo from command line you have to type


  bash> git clone https://github.com/qooxdoo/qooxdoo.git 

This will take some time to complete the download because a git repository contains the complete history. Once the download completes you can create a new project through


  bash> mkdir workspace && cd workspace && ../qooxdoo/create-application.py --name=DemoApp
  bash> cd DemoApp && ./generate.py build

The final result:

This will generate a simple push button on a web page.

First Qooxdoo Application

Now granted that this is not the coolest web page out there but you have only spent about 5 minutes to create it. Now if you spend some more time on it you can eventually create more complex applications, like a Random Password Generator ( approx 100 lines of code ) or a simple calculator ( approx 200 lines of code ).

As a matter of fact you can create quite complex applications which natively support multiple languages, multiple Themes, multiple icon sets etc … . I believe if you have an idea of a complex web based application you will find a solution with Qooxdoo.

As with the first episode, you can checkout the code online Here …

Questions or suggestions ?

Please don’t hesitate to leave a comment below if you have questions or suggestions. I had fun creating this short tutorial and I hope it is useful to you.

Cloud abstraction layer

The plain pain

Imagine that you have written a really good web app, and you have distributed it to many customers these customers in turn acquired a lot of customers.

Now fast forward a few months and all of a sudden you are getting calls to help fix issues with your platform. For some unforsaken reason your cloud storage integration stopped working.

Because you have moved on to the next thing you have only limited time to spend on fixing the issue. What you eventually discover is that a service provide decided to change the API from version X to version Y.

Now you have to sit down and spend a couple of days fixing what is been broken.

Sleep Mode Zero
Sleep Mode Zero

That is something you have to deal with all the time in an actively changing web environment.

APIs change and certain providers may stop offering services or worse go out of business.

How to avoid the pain

Most web based APIs use a RESTFul interface to their services. As such the steps involved in utilizing a online service is usually accomplished through OAuth2 authorization to gain secure access to users data, followed by the utilization of the actual API.

As a developer you are free to develop to a specific API or to abstract the API in a way where you can easily replace one service/API with another.

However every single line of code you write you will have to maintain yourself and make sure that changes over time will not break functionality.

Cloud abstraction layer, the better way

Every now and then you can do one better though. Take for example web storage. There are many providers of web storage, such as box, Dropbox, S3, Google storage etc. If you want to offer a wide selection of possible back-end storage platforms you would be well advised to look into a framework such as Flysystem for PHP.

The PHP League Logo
The PHP League Logo

Flysystem abstracts it the different back-end APIs and provided a unified interface. You can find a multitude of third party connectors, such as Azure, S3, Dropbox, box etc. You can also find some strange adaptations such as GitHub or flicker for it in case you have use for it.

The most important thing to remember though is that if one of the available back-end APIs changes you will be able to replace it with almost no additional work required on your side.

Also if a provider goes out of business, you can quickly switch to another provider. And finally, if a service provider changes the API version and ignores backwards compatibility you can simply replace the old library with a new library with the same API calls.

There are however some shortcomings to adding an cloud abstraction layer

  • It is usually not as comprehensive in its feature set
  • The additional code will slow down the requests a few milliseconds
  • It will increase the projects complexity
  • Not every supported back-end-API may provide the required data. E.g. certain storage back-ends don’t support a file system natively

AstraNOS integration

Since I had to move from Dropbox v1 to Dropbox v2, I switched over to utilize the cloud abstraction layer provided by Flysystem for AstraNOS. Integrating the OAuth2 client from the PHP League us also unifying the signups mechanism for cloud storage back-end ( and more if I ever need to ).

Working Dropbox integration

With this addition I will now be able to increase the available back-end services with little additional work, though I would guess that it still requires a good day per back-end.

However this is a price worth paying if we can leverage multiple cloud based back-ends at the same time and in the same environment. Working seamlessly between them as it has been intended.

Online JavaScript IDE for AstraNOS

The past few days have been filled with some exciting new features for AstraNOS.
I am adding things as I am using AstraNOS and certain features are missing.

Changes to the IDE

The IDE received a direct integration of the online help for QooxDoo as well as the ability to run your JS application windows directly from within the IDE.

Online JavaScript IDE

Creating new application, and dialogs has never been that easy for me. This will be very helpful when I continue to work through the next few training videos for QooxDoo and AstraNOS.

New Class Dialog
New Class Dialog

Another add-on to the IDE is the “New Class” menu item which will now bring up the following dialog to select the type of class you want to create.
You can take the IDE for a spin using this link : https://www.AstraNOS.org/MiyamotoMusashi/BattleGround.php?course=1

Changes to the FolderView

New Context Menu Items

Finally I added “Download”, “Copy”, and “Rename” to the context menu items in the Folder View, and “Paste” if you right click on an empty space.

This way you can now use the FolderView to work with files which is faster. Previously you would have to go to the ContentBrowser to achieve the same.

ContentBrowser Context Menu

The ContenView is still the main dialog to work on / with files as it supports working on files sitting in your box or DropBox accounts.

Dropbox Kaput :

Well, the ContenView WAS able to use Dropbox, until September this year. Here is DropBox’s announcement :
“In June 2016, we announced the deprecation timeline for API v1. When API v1 is retired in September 2017, any further API v1 calls will fail with a 400 error with the body:”

and sure enough …

Uncaught exception 'Dropbox\Exception_BadRequest' with message 'HTTP status 400
{"error": "v1_retired"}'

So I went ahead and I chose https://github.com/kunalvarma05/dropbox-php-sdk to replace the older library I was using. I am planning in completing the port within the next two days.

Program a random password generator in QooxDoo

I have created my first video in a series of planned videos on programming in QooxDoo.

Programming in QooxDoo:

QooxDoo is a object oriented JavaScript library which allows you to create any type of widget, like List controls, Tree controls, Windows etc. Inside the browser without the need to worry about browser compatibility.

Aside from being very easy to use, this framework is fully object oriented and is better than any other framework I have seen in the past. Obviously people have their own preferences, and frameworks like jQuery, and Angular are at the top of their game. QooxDoo like other frameworks has strong parts and its weak parts.

This episode goes through some basics first before I dive into the programming part. As mentioned above I create a random password generator which you can use whenever you are asked to either create a new password or re-new your old password.

You can find the video on YouTube.

Password Generator preview

The resulting application looks like this

What I have learned from my first video tutorial:

I found that my mic is too sensitive to the higher frequency ranges and going forward I will have to either find a hardware equalizer or do some post production on the audio in software.

Since I am using Linux, my setup is all open source and freely available. As such some of the shortcomings are that Audacity is crashing once in a while, KDenlive was constantly crashing and unusable so I had to switch to OpenShot. I may give Blender’s built in NLE ( Non Linear Video Editor ) a go in a future part.

My keyboard ‘hacking’ is way to loud and will either need to find another keyboard, try to get the right filter settings to suppress it as much as possible ( without too affecting the overall audio quality too much ) or place my mic in a better spot.

Bottom line:

I had a lot of fun putting this tutorial together. I spent probably twice as much time on getting my equipment in place, and preparing AstraNOS for the link to allow people to try for themselves Here …..

The next episode will take most likely less time overall and I will also try my best to cut down the duration of the next episode to be 10 minutes or less.

I learned a ton of things and I am going to continue to learn during my next videos.

RIP TechShop

We do not have a TechShop in our area however anytime a space where makers meet and create, teach, and discover closes it is a setback to education, innovation and curiosity.

“We have grown from one location in Menlo Park to 10 locations across the US and 4 Internationally..”

About TechShop

Founded in October 2006, TechShop started as a membership-based, do-it-yourself (DIY) workshop and fabrication studio. Over a decade later, TechShop, Inc. grew into an international consulting company sharing it’s makerspace expertise with grade schools and fortune 500 companies alike.

TechShop offered consulting, market assessments, licensing options, curriculum, and various other managed services to economic development councils, libraries, non-profits and educational institutions, design firms and other makerspaces. TechShop encourages you to find a way to grow the maker movement in your community. It’s worth the effort.

TechShop-Makerspace

RIP TechShop

Yesterday TechShop suddenly filed for Chapter 7 bankruptcy protection. TechShop is no more and its remaining assets will be sold off by the appointed Trustee.

Embrace

It hits home insofar as we have purchased one of the original Embrace bracelets for my son who has seizures. This device will send out an alarm when a seizure occurs to the connected phones. It was listed as one of the success stories coming out of the TechShop.

+200,000 infants reached
+13,000 health care workers trained
105 programs in 20 countries
A life-saving incubation blanket for babies. In 2008, a group of Stanford students sought to address high mortality rates among premature and low-birth-weight babies by designing a better incubator for the developing world. The invention, the Embrace infant warmer, was prototyped at TechShop San Francisco and is now saving thousands of lives worldwide.

Here is the link to the TechCrunch story about the demise of TechShop.

As I am still working on my Video Doorbell, I can use NOVA-Labs which is very close by. As of today, some Americans will no longer have the ability to roll down the road to get their inventions into reality.

It would be great if the likes of Amazon, Apple, Google would step up and sponsor these types of locations all around to keep the spark of innovation going.

With this bit of sad new I will go and start my Friday.

Startup ignite November 2017

Today I went to one of our local startup incubator called startup ignite.

Startup Ignite Flyer

The Meetup was originally started by Amu Fowler in ? 2014 ? And over the years I went to a few of these meetings on and off. I find it very interesting to meet new people, and see what ideas or dreams they have.

Meeting Amu at the Ignite Meetup

The Place:

This months Meetup was focused on patent on general and how they retire to a startup. You can find a link to the video below.

NOVA-Labs Logo
NOVA-Labs Logo

It was held at the NOVA-labs facilities in Reston VA, which in itself is another very interesting space to discover. I have a few projects which could use a 3D printed Chassis or use some of their tooling or build a 12ft tall Optimus Prime.  But I leave this to another time.

NOVA-Labs mad science going on
NOVA-Labs mad science

The People:

In the past I have mostly met and talked with people who were in the ideation phase or in the very initial phase of building a prototype or advancing their ideas. This time around I met a few folks who were in beta testing ( rukku.io ).

I had also a very techie talk with Keith Fowler, who is one of the organizers and likes to talk about programming languages probably add much as I do.

The good, the better, and the best:

Overall the Meetup was about twice the size since the last time I went and the content of the speeches and presentations were at a great level. I can only recommend to go and visit one of those meetups if you are ever in the greater northern Virginia area.

Maybe it’s just me, maybe it’s the free pizza or maybe it’s the flair of the startup scene … but whatever it is, you will leave the place with a great satisfaction and who knows you may catch the startup bug.

Startup Ignite crowd