Category Archives: Android

Android Storage Wars

If you have ever tried your hand on coding for Android you certainly have found google’s JAVA based API to be somewhat of a incoherent mess in certain areas, which over time has evolved into an even larger incoherent mess in even more areas.

One of those messy areas is that of the android secondary storage API. All phones have a primary storage area, where you can store images, videos, apps, and application data, and some phones come with a secondary storage option. The API to gain access to the primary storage has evolved over time but allows you to seamlessly integrate proper functionality into your app.


Now you may assume that the Android secondary storage would follow the same paradigm, and grant the same access as the primary storage to your app. However you would be wrong making this assumption. The reason you have apps like the “ES File Manager” handling this for you seamlessly is purely through tricky code in the background which circumvent googles protective scheme for secondary storage, Aka a hack.

Dont do evil … yeah right!


Yes, google in its drive to push people into using their cloud storage is actively pressuring phone makers to get rid of that large secondary storage, or worse the micro-SD slot. That overarching goal of google is driving the API and the access rights to the Androids secondary storage media in a negative way.

Let’s start with a small bit of terminology. Since the dawn of Android, nearly every type of storage has been considered “external storage” even the non-removable flash memory that comes in every device. To distinguish, the non-removable flash memory is called “primary storage”<, while a removable micro SD card is called “secondary storage”. In the early Android versions, an app merely needed permission to WRITE_EXTERNAL_STORAGE to be able to fully access both primary and secondary storage.

In March, 2011, a drastic change to Android was made which changed how secondary storage mediums (external SD cards) were mounted by the Android OS. Specifically, the commit read like this: “Mount secondary external storage writable by AID_MEDIA_RW rather than AID_SDCARD_RW.” This meant that the media would now have to belong to the “media_rw” group to modify the contents of the SD card. As a result, a new permission, called WRITE_MEDIA_STORAGE, was added to the source code. Basically, WRITE_MEDIA_STORAGE replaced the original WRITE_EXTERNAL_STORAGE.

This change has a devastating effect on apps trying to utilize secondary storage because from now on forward only system apps could request the permission to read/write to the external storage ( I.e. sdcard ).

Android secondary storage

Since the WRITE_EXTERNAL_STORAGE permission could be used by any normal app and thus any app can write to the primary storage but not to the secondary storage (external micro SD cards). The WRITE_MEDIA_STORAGE permission could write to the external micro SD card, but regular user apps could not request the permission. This change took place on Android 3.2 Honeycomb, but due to the logistics of hardware and storage mediums at that time, it was barely noticed.

Quote: “Starting around the time of Android 4.4 4 KitKat, and even a little earlier, the implementation of the userspace FUSE filesystem, in conjunction with changes to the open source code, resolved this problem. Yet, still to today, even with Android 8.x.x Oreo, third party apps must explicitly get the user’s permission for both primary and secondary storage before the app can alter either storage medium in any way. And of course, the newer concepts of adoptable storage have alleviated problems in this regard.” — end quote.

Bottom line

Thanks to google the way that most apps now handle android secondary storage heavily depends on the Android version being used. Unfortunately at this time most phones will have a hard time working with the secondary storage, but some phones do. I have updated the file browser integration into my apps and have fixed the issue of secondary storage on some Android versions and not on others.

This whole debacle has not only cost me weeks of effort and research, it has negatively affected all apps with file system access and is the main reason that almost all apps only storing their data on the primary storage, which in most cases is much smaller than the external storage. At this tmie you can get a cheap microSD card with up to 512 GB. However what good is this in your phone if most apps can only use the built-in 16GB ?

Can the Google Play Store Stats be trusted

The Play Store Stats contain important metrics about your apps in the Google Play Store. Any app developer has noticed by now ( August 2018 ) that Google is changing the stats displayed in the developer console and in the app store.

One of the largest changes has been the removal of the “Total Installs” from the play store stats in the developer console. A move which is causing a lot of trouble to me because I relied on it for my growth goals. Google’s reasoning behind this is that it wants quality apps and as such the number of active installs is what Google wants developers to focus on.

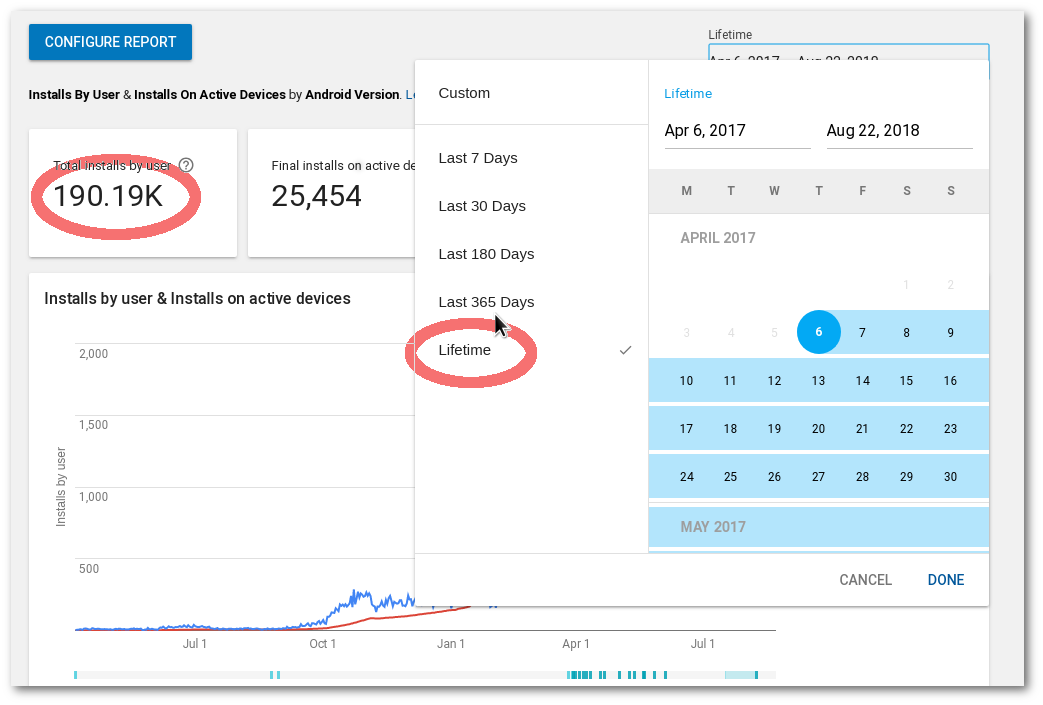
I used to look at both numbers together and determine what the rate of adoption was ( E.g. 22% of people installing my app would retain it ). Now however I have to gobble these numbers together through a few more mouse clicks. By choosing “Number Of Installs” for the period “Lifetime” of the app.

Google Play Console Total Downloads

Another unfortunate change that I have just noticed is the elimination of the displayed download tiers in the Play Store. I have a fairly new app n the app store which has just crossed the 5k download mark. The Play store used to honor this by displaying Installs 5000+. However, as of today, with a total install of 5,535 I do see this in the Play Store:
Google Play Store Total Installs

I also noticed that frequently the displayed metrics are distorted after Google changes ( Aka tweaks ) the formula behind the metric. For example the number of active devices would unexpectedly drop from one day to another by a few hundred. However at the same time, the play store stats showed a positive difference between installed and uninstalled apps.

The number of active devices is “Number of Android devices that have been active in the previous 30 days that your app is installed on.”. If that’s the case and Google’s number would be accurate it would mean a hell of a coincidence that a few hundred users of my app stopped using their phone at the same day.

Stats Madness at Google

I wonder how many more changes there will be in the future for app developer. After all if I can not rely on the metric displayed in the app store stats, what are the chances that the numbers in Google Ads are accurate ? I guess there is really no way to tell.

Below is the link to Reverse Video Magic. Can you see how many installs ?
Get it on Google Play

Revert Video Magic Video Android-app

After returning from vacation this year I wanted to edit and send some videos to my family which should highlight some of the more outstanding experiences in a funny but interesting way. The Revert Video Magic app for Android on the google play store was exactly what was needed for this job.

I was looking to take a piece of a video, and revert parts of it and then replace this part with a sequence of forward, backward, forward action all abound. Here is the resulting video to better explain the effect I was after.


I looked around but could only find one app on the google play market which would offer me this functionality. Revert Video Magic for Android

The below images are screenshots of the main screens for Revert Video Magic for Android

The Main Screen is where you select the source video from, that is you can either browse through the media library of your phone or you open a File Browser which allows you to browse the file system of your phone. You can even use your video camera and shoot the video from within the app.

Revert Video Magic Main Screen
Main Screen
Revert Video magic settings screen
Revert Video Settings screen
Revert Video Magic Share Screen
Share Screen

Once you have selected the source video you would like to use, you arrive at the settings page. The Revert Video Magic Settings page allows you to modify the resulting video resolution, the speed of the reverted part, as well as cutting the start and end points of the target video.

Once these settings are set, you will see the Post Processing screen of the revert Video Magic app. This page allows you to actually replace the selected part in-place of where the original video part was. None of the other revert video apps on the google play store do allow for this to happen.

Using the -SHARE- button on the top right corner of the Share screen will then allow you to finally send the video to your friends or share it on social media like YouTube, FaceBook etc.

This app is focused on doing one thing but doing it right. The built in video player, Camera functionality, File Browser, and Share functionality are all part of making reversing part of your video as much fun as the final video.

Feel free to download the app for free from the link below.

Get it on Google Play

Rpi WebRTC Streamer to Android WebRTC streaming

In this article I will setup Android WebRTC streaming to RPI-WebRTC-Streamer running on my Raspberry PI Zero W, to talk to each other.

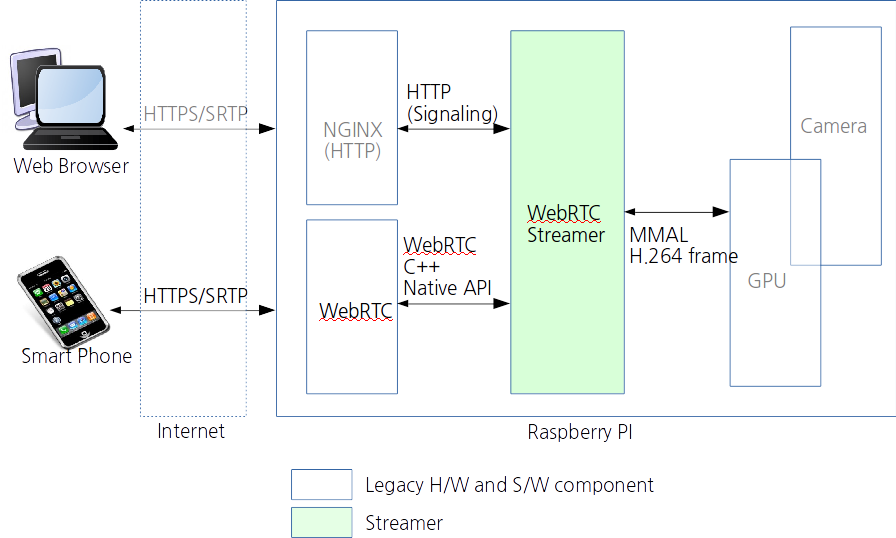
Here is the architecture of RPI-WebRTC-Streamer.

Now why do we use WebRTC instead of directly streaming audio/video through a socket from the Raspberry PI to the Android device ?

It is helpful to understand how WebRTC works under the hood and how a connection is established.

The magic in WebRTC is the probing of the connection to allow two clients to talk P2P ( Peer-to-Peer ), even if they are behind a firewall or using NAT. There are plenty of online resources devoted to this complex topic ( E.g. https://www.html5rocks.com/en/tutorials/webrtc/infrastructure/ )

The basic steps in establishing a WebRTC connection are:

  • Step 1: Signaling: both peers connect to a signaling server (using websockets over 80/443, comet, SIP,etc..) and exchange information (about their media capabilities, public IP:port pairs when they become available, etc.)
  • Step 2: Discovery: Devices connected to LAN or mobile networks are not aware of their public IP (and port) where they can be reached at so they use STUN servers located on the public Internet to discover their ip:port pair (ICE candidates). In the process they punch a hole through the NAT/router which is used in step3:
  • Step 3: P2P connection: once the ICE candidates are exchanged through the initial signaling channel each peer is aware of each other’s ip:port (and holes have been punched in NATs/routers) so a peer to peer UDP connection can be established.
  • Step 4: If a P2P connection can’t be established ( maybe through firewall rules or the usage of Symmetric NAT ) then TURN servers can be used, which will relay the data between the peers. Please note that this will require the TURN server to receive and send all video and audio and is the last resort in WebRTC.

Under normal circumstances you would establish the connection between two web-browser. However in this case I need to establish Android WebRTC streaming to the Raspberry PI Zero W. Fortunately we have the required tools and libraries available on both platforms and can take full advantage of this technology stack. This allows us to basically build a video conference similar to skype between the Raspberry PI and Android. As an aside, iOS can also handle WebRTC, which may be a project for later.

Android WebRTC Streaming:

  1. Lets first make sure you have the RPI WebRTC Streamer setup, as explained in my previous post.
  2. Then you have to install ADB onto your computer to be able to transfer the App to your Android phone.
  3. Connect your Android phone to your computer and make sure you have the developer option enabled
  4. Next get the source code for RPI WebRTC Streamer from github and install it onto your phone, like so.
    bash> git clone https://github.com/kclyu/rpi-webrtc-streamer.git
    bash> cd rpi-webrtc-streamer/misc
    bash> adb install AppRTCMobile.apk
    
  5. Next open the app on your Android phone
  6. Change settings of the Video encoder to H264 High
  7. Change the resolution to VGA(640 x 480)
  8. And then simply enter the IP address of your raspberry PI as the room number
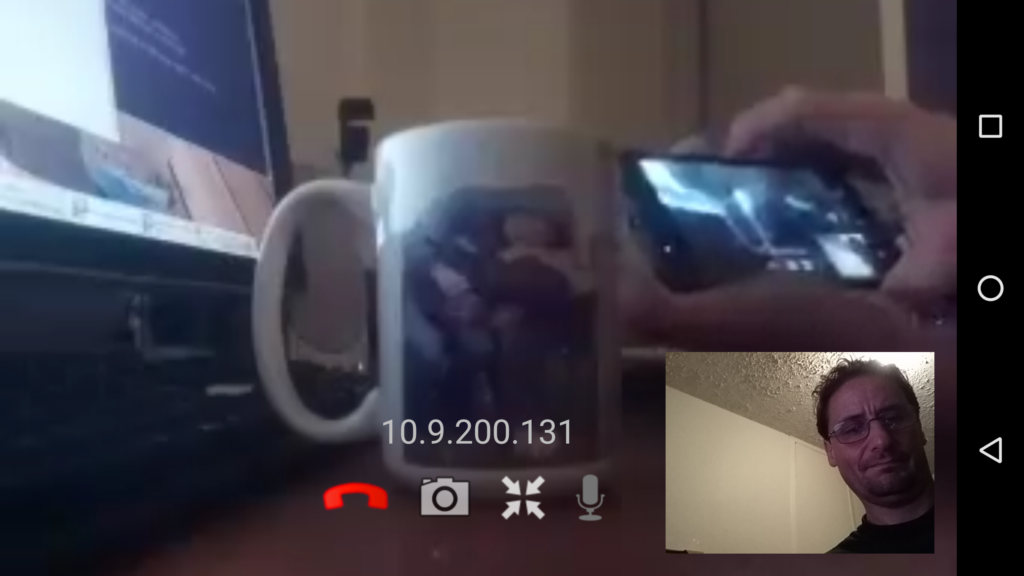
Android WebRTC streaming in action

Finally, here is the article from mpromonet if you ever feel like compiling rpi-webrtc-streamer https://www.raspberrypi.org/forums/viewtopic.php?t=186271.
You can even use docker containers to make things easier: https://hub.docker.com/r/mpromonet/webrtc-streamer/

As an aside, I found multiple Android app templates to use WebRTC

uv4l WebRTC vs rpi-webrtc-streamer

I have spent the past two days working with the uv4l driver to get WebRTC working. I eventually got everything to work with three major issues

  1. I could not get the transmitted quality to anything close to what I needed
  2. I could not get rid of the the watermark which was put over the video
  3. The complete CPU utilization for 640×480 was above 90% and caused issues.

Another slightly annoying issue was that I had to re-install Jessie after I found out that uv4l is currently not available for Raspbian stretch lite. I could only find the full version for Jessie, which requires at least a 8GB microSD card. And off I went to replace my 4GB microSD card.

On the positive side I installed rpi-webrtc-streamer from github and was able to look at the results in realtime right away.

Unlike uv4l, which is based off OpenWebRTC from Ericson, rpi-webrtc-streamer is based off the Native Code from www.WebRTC.org which seems to be a bit more responsive than uv4l.

Here are the steps I had to do to get things to work.

bash>  # First create a home for the code
bash>  mkdir utils && cd utils
bash>  git clone https://github.com/kclyu/rpi-webrtc-streamer.git

You can find the Android App under rpi-webrtc-streamer/misc/AppRTCMobile.apk
But first lets avoid the work and go straight to installing the software.

Go to https://github.com/kclyu/rpi-webrtc-streamer-deb and download the appropriate deb-package.

bash>  dpkg -i rws_xxx_armhf.deb
bash>  sudo systemctl start rws

Then simply point your browser at http://<IP Address>:8889/native-peerconnection/

Raspberry PI camera
Raspberry PI camera

I will be going through the setup and usage of the Android App which is part of rpi-webrtc-sstreamer in one of my next blog entries.