Moving from 2D planar photos to 360 degree images is like jumping through the pane of glass of an image and immersing yourself in hat frame. Take your time, look around and view the wonders captured in that moment.
Today I want to teach you how to create a interactive 360 degree image viewer using plain old JavaScript with the help of A-Frame / ThreeJS and as usual you can go ahead and play with the results by following the link on the bottom.
A-Frame … say what ?
In the last episode we took some ShaderToy WebGL based shader and ported it to threejs and generated a nice animated background with this method.
A-Frame is using a XML based syntax to expose the underlying library of … you guessed it … threejs. That of course means that all features of threejs are at your convenience when using A-Frame.
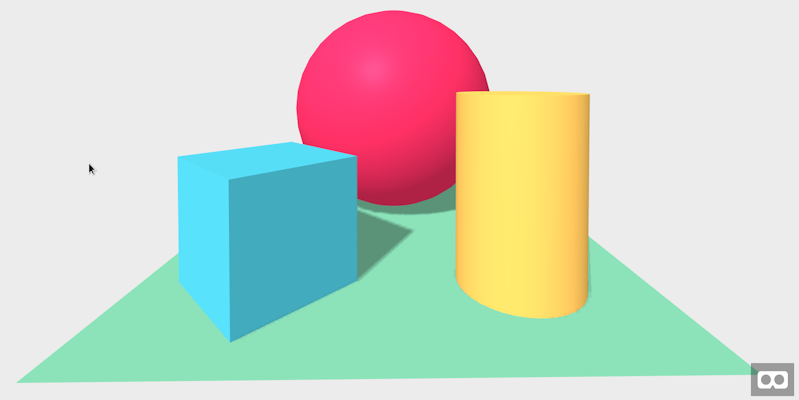
This combo does not only pack 360 degree of freedom but it also allows you to place elements in 3D space, which makes for a nice combo. Below is a simple “hello World” page using A-Frame.
<!DOCTYPE html>
<html>
  <head>
    <title>Hello, WebVR! - A-Frame</title>
    <meta name="description" content="Hello, WebVR! - A-Frame">
    <script src="https://aframe.io/releases/0.7.0/aframe.min.js"></script>
  </head>
  <body>
    <a-scene>
      <a-box position="-1 0.5 -3" rotation="0 45 0" color="#4CC3D9" shadow></a-box>
      <a-sphere position="0 1.25 -5" radius="1.25" color="#EF2D5E" shadow></a-sphere>
      <a-cylinder position="1 0.75 -3" radius="0.5" height="1.5" color="#FFC65D" shadow></a-cylinder>
      <a-plane position="0 0 -4" rotation="-90 0 0" width="4" height="4" color="#7BC8A4" shadow></a-plane>
      <a-sky color="#ECECEC"></a-sky>
    </a-scene>
  </body>
</html>

Also this library comes jam-packed with additional plugins and a vibrant community. Here is a link which lists some of the available tools and plugins. And then here is a weekly blog which lists all the cool things going on around A-Frame.
To say it in their own words: “A-Frame is a web framework for building virtual reality (VR) experiences. Originally from Mozilla, A-Frame was developed to be an easy but powerful way to develop VR content. As an independent open source project, A-Frame has grown to be one of the largest and most welcoming VR communities.”
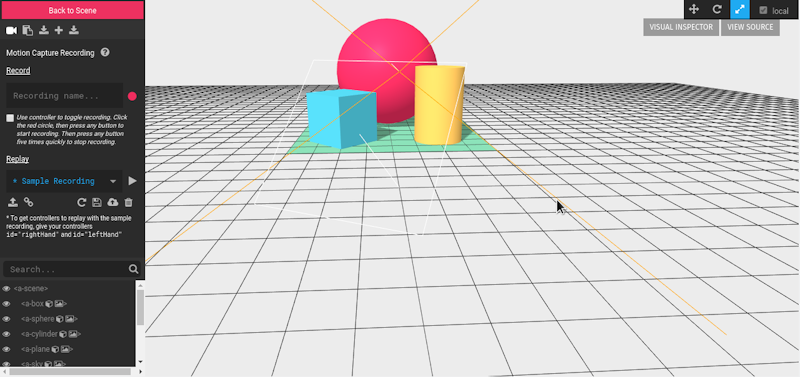
Another nice feature is the visual inspector which is available in every A-Frame scene. Simply hit “ctrl” + “alt” + “i”

360 degree Viewer:
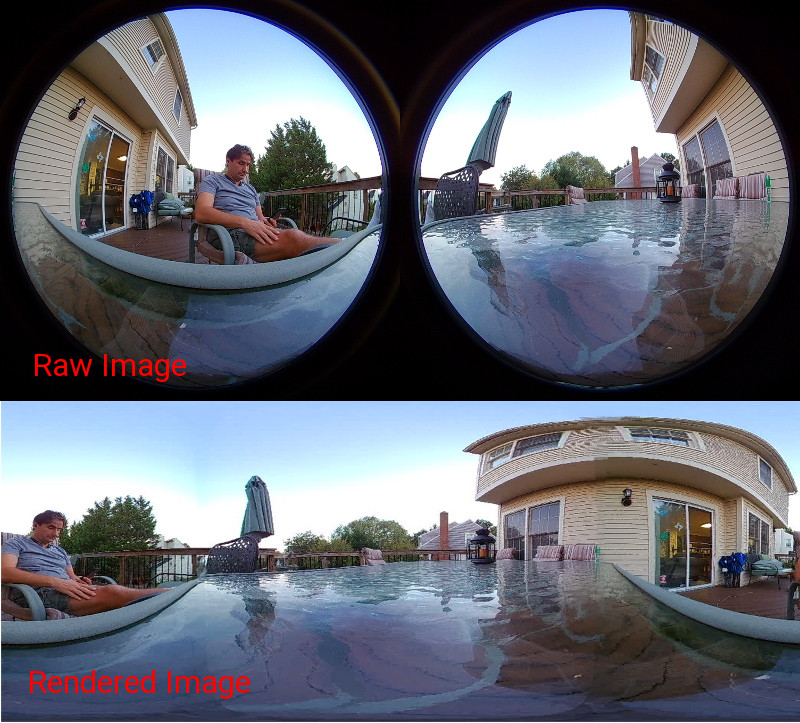
One of the things I have been playing around with lately is the Gear 360 camera from Samsung. As you can see from the image below, it has two large fish eye lenses which together capture a monoscopic 360 degree image or video.
The camera records with the two lense on a single rectangular region, in order to convert the images / videos from this raw input into a usable equirectangular view you have a couple of options at hand.


The easiest would be to own a Samsung phone and then simply have the Android app export the image / video already rendered. The second option Samsung offers is an external application for Windows or Mac OSX to convert the input to its proper format.
And then finally there are third party options available ( like  ) or you can get smart and create your own. For brevity I went with option number one which also means that I have not a lot to say about this process in this post.
The takeaway here is that you need to have the images for the 360 Viewer already in equirectangular form available. In case you do not own a 360 camera you can easily find a ton of images online by searching for “360 equirectangular image” or similar.
Also I added a few sample images to this tutorial.
Lets go :
Our goal here is to create a basic html page which can display 360 degree images. So the first thing we have to create is the basic HTML document like so :
<!DOCTYPE html>
<html>
<head>
<meta charset="utf-8">
<title>360° Slideshow</title>
<meta name="description" content="360° Slideshow">
</head>
<body>
</body>
</html>
Nothing to it. Next we can build the A-Frame based web page so we need to add two lines to the head section :
    <script src="https://rawgit.com/aframevr/aframe/ba2a287/dist/aframe-v0.7.1.min.js"></script>
    <script src="drag-look-controls.min.js"></script>
Including first the A-Frame library ( which includes threejs ) and in the second line I use a component to better navigate using the cursor. At this point we can go ahead and fill in the contents of the HTML body.
Working in 360 degree of freedom allows us to place elements inside the view and interact with them. I placed the controls to switch between images to the users right side so they don’t obstruct the main focal point in the 360 degree scene.
Below is the complete content and I will go through it line-by-line.
    <a-scene cursor="rayOrigin: mouse">
      <a-assets>
        <audio id="click-sound" src="click.ogg"></audio>
        <img id="pano1"  src="pano1.jpg">
        <img id="pano2"  src="pano2.jpg">
        <img id="pano3"  src="pano3.jpg">
        <img id="pano4"  src="pano4.jpg">
        <img id="pano5"  src="pano5.jpg">
        <img id="pano6"  src="pano6.jpg">
        <img id="pano7"  src="pano7.jpg">
        <img id="pano8"  src="pano8.jpg">
        <img id="pano9"  src="pano9.jpg">
        <img id="pano10" src="pano10.jpg">
      </a-assets>
      <a-sky id="pano" src="pano3.jpg" rotation="0 0 0"></a-sky>
      <a-camera drag-look-controls>

        <a-cursor id="cursor">
          <a-animation begin="click" easing="ease-in" attribute="scale"
                   fill="backwards" from="0.1 0.1 0.1" to="1 1 1" dur="500"></a-animation>
          <a-animation begin="cursor-fusing" easing="ease-in" attribute="scale"
                   from="1 1 1" to="0.1 0.1 0.1" dur="1500"></a-animation>
        </a-cursor>
      </a-camera>
      <a-text id="prev-txt" value=" << " color="#F84" width="4" position="-0.6  1.5 -1.0" font="kelsonsans">
        <a-animation attribute="rotation" begin="click" dur="500" fill="backwards" to="30 30 360"></a-animation>
      </a-text>
      <a-text value="prev / next" color="#F84" width="3" position="-0.35 1.5 -1.0" font="kelsonsans"></a-text>
      <a-entity id="file-name" geometry="primitive: plane; width: 0.7; height: auto" material="opacity: 0.5; color: #f84"  position="-0.0 1.35 -1.0" text="value: pano3.jpg; align: center"></a-entity>
      <a-text id="next-txt" value=" >> " color="#F84" width="4" position=" 0.4  1.5 -1.0" font="kelsonsans">
        <a-animation attribute="rotation" begin="click" dur="500" fill="backwards" to="30 30 360"></a-animation>
      </a-text>
      <a-box prev-click="" sound="on: click; src: #click-sound" visible="false" color="#aa77dd" width="0.28" height="0.18" depth="0.01" opacity="0.5" position="-0.5 1.48 -1.0"></a-box>
      <a-box next-click="" sound="on: click; src: #click-sound" visible="false" color="#aa77dd" width="0.28" height="0.18" depth="0.01" opacity="0.5" position="0.48 1.48 -1.0"></a-box>
    </a-scene>
Line 1 : defines the scene. Everything happens within a scene. So think of it as the starting point for your adventure into VR. in order to use the mouse to select an object you have to specify the rayOrigin attribute here.
Lines 2 – 14 : we define the assets ( images video, models, audio etc ) in these lines. The scene will not start before all assets are buffered in the browser. You can also dynamically load contents in which case you may not want to define them in the assets section.
Line 15 : defines the sky-box, which is basically a sphere on which the equirectangular image is plastered.
Lines 16 – 24 : Here we define the camera and the cursor. The drag-look-control enables the mouse to drag the frame which make navigation easier and more natural. I also added animations to the cursor to make things a bit ‘nicer’.
Lines 25 – 32 : Here we create three strings which we display in 3D space. “<<", "prev / next", and ">>”. Again some animation when the prev or next events are triggered.
Lines 33 – 35 : These two lines define an invisible box around the “<<", and ">>” text to allow us to select something with our mouse. YOu cannot directly point and select a text. Once selected, the events are then routed forward to the actual text elements to trigger the animation.
That was it, that was all we had to do to get the scene setup and ready. Except …
Finally some JavaScript
You can use the above and you can already immerse yourself in a 360 degree world, except you will not be able to switch between images as we have not yet implemented the JavaScript handler for the mouse action. So lets do that then …
  var gPanoStart = 1;
  var gPanoEnd   = 10;
  AFRAME.registerComponent('prev-click', {
    init: function () {
      this.el.addEventListener ( 'click', function (evt) {
        var txt = document.getElementById ( "prev-txt" );
        txt.click ( );
        var el = document.getElementById ( "pano" );
        if ( ! el.cnt || el.cnt <= gPanoStart )
          el.cnt = gPanoEnd+1;
        el.cnt--;
        var src, srcName = "pano"+el.cnt;
        src = document.getElementById ( srcName );

        var fileName = src.src.replace(/^.*[\\\/]/, '')
        el.setAttribute ( "src", "#"+srcName );
        txt = document.getElementById ( "file-name" );
        txt.setAttribute ( "text", "value", fileName );
      } );
      this.el.addEventListener ( 'mouseenter', function (evt) {
        var txt = document.getElementById ( "prev-txt" );
        txt.setAttribute ( "color", "#FFDDDD" );
      } );
      this.el.addEventListener ( 'mouseleave', function (evt) {
        var txt = document.getElementById ( "prev-txt" );
        txt.setAttribute ( "color", "#FF8844" );
      } );
    }
  } );
  AFRAME.registerComponent('next-click', {
    init: function () {
      this.el.addEventListener ( 'click', function (evt) {
        var txt = document.getElementById ( "next-txt" );
        txt.click ( );
        var el = document.getElementById ( "pano" );
        if ( ! el.cnt || el.cnt >= gPanoEnd )
          el.cnt = gPanoStart-1;
        el.cnt++;
        var src, srcName = "pano"+el.cnt;
        src = document.getElementById ( srcName );

        var fileName = src.src.replace(/^.*[\\\/]/, '')
        el.setAttribute ( "src", "#"+srcName );
        txt = document.getElementById ( "file-name" );
        txt.setAttribute ( "text", "value", fileName );
      } );
      this.el.addEventListener ( 'mouseenter', function (evt) {
        var txt = document.getElementById ( "next-txt" );
        txt.setAttribute ( "color", "#FFDDDD" );
      } );
      this.el.addEventListener ( 'mouseleave', function (evt) {
        var txt = document.getElementById ( "next-txt" );
        txt.setAttribute ( "color", "#FF8844" );
      } );
    }
  } );
Both of these functions are almost identical, the first handles the prev-action, the second handles the next-action. I could have optimized it to decrease the code footprint but this would make it harder to read it. So lets only look at the first function.
Lines 1 – 2 : Here we define the global variables containig the starting and ending number of the images to load.
Line 3 : registerComponent is A-Frames way to do stuff. prev-click is the invisible rectangle which we are using to capture the mouse ‘ray’ to cause a certain action like click, mouseenter, or mouseout.
Line 4 : init. ‘nough said. just go with me here.
Lines 6 – 7 : Here we get the dom element of the actual visible text element and trigger a click event. This in turn will trigger the animation which we have defined for this element.
Line 9 : we retrieve the dom element of the sky-box.
Lines 9 – 13 : Here we make sure the counter is in between Start and End, and we create the id of the source file as defined in the <a-assets> – tag.
Line 15 : Here we get the ‘src’ attribute of the dom element and extract the actual file name to display.
Line 16 : is what makes the image switch, where we set the src of the sky-box.
Lines 17 – 18 : These two lines change the display of the filename inside the A-Frame. This way you know what you are looking at.
Lines 20 – 27 : These two functions will simply change the text color of the prev and next text to imply a hot-spot to the user.
Aside from line 3 and 4 this should look all too familiar to anyone who tinkered in plain old javaScript ( and who has not done so ? ).
You can get this code, adjust the images, and use it to add a 360 degree image viewer into your own web page. You can also use what you have learned here today and add additional control elements like slideshow, auto-rotate, hot-spots etc to it.
Please follow this link here … to play with the code.

